Oracle AI Database 26ai Data Guard Installation
- Ömercan Çalım
- Mar 2
- 8 min read


Oracle 26ai Data Guard Installation Requirements
Inventory
Primary database and host details:
Hostname: hexdb.localdomain IP: 192.168.0.20 OS: Oracle Linux 9.7 Database Version: 23.26.1.0.0 Grid Version: 23.26.1.0.0 Grid: +ASM DB_NAME: TEST26 DB_UNIQUE_NAME: TEST26 SID: TEST26
Standby database and host details:
During the installation of a standby database, after the database software is installed using the runInstaller.sh tool, a database is not created with DBCA (Database Configuration Assistant).
Hostname: hexdg.localdomain IP: 192.168.0.21 İşletim Sistemi (OS): Oracle Linux 9.7 Veritabanı Sürümü: 23.26.1.0.0 Grid Sürümü: 23.26.1.0.0 Grid: +ASM DB_NAME: TEST26 DB_UNIQUE_NAME: TEST26DG SID: TEST26DG
Virtual Machine Details
Although in this article we use servers running Oracle Linux 9, since Oracle 26ai can also be installed on Oracle Linux 8, the choice is yours. We will create both of our servers, whether running OL8 or OL9 with the same hardware specifications. You can find the hardware details below.
If you are not familiar with virtual machine installation, you can review the Oracle Linux 8.10 Installation using VirtualBox 7.1 guide. Since there is no significant difference between a standard Oracle Linux 8 and Oracle Linux 9 installation, you can find all the necessary information for the setup in the related document.

Database Details
Since the installation of Oracle AI Database 26ai Enterprise Edition and Oracle Grid Infrastructure 26ai is very similar to a standard Oracle Database 19c and Oracle Grid Infrastructure 19c (Oracle Restart) installation, you can find the differences encountered during the setup below. For the general installation flow, you may refer to the Oracle Grid Infrastructure 19c (Oracle Restart) Installation document.
After completing the required installations on both of our servers, we can proceed with the Oracle 26ai Data Guard setup.
26ai: dnf install oracle-ai-database-preinstall-26ai -y 19c: dnf install oracle-database-preinstall-19c -y
26ai database and Grid files: Oracle AI Database 26ai (23.26.1) - Linux x86-64 Oracle AI Database 26ai Grid Infrastructure (23.26.1) - Linux x86-64
26ai database and Grid home directories:
mkdir -p /u01/app/oracle mkdir -p /u01/app/oraInventory mkdir -p /u01/app/oracle/product/23.0.0/dbhome_1 mkdir -p /u01/app/oracle/product/23.0.0/grid chown -R oracle:oinstall /u01/app/oracle chown -R oracle:oinstall /u01/app/oraInventory chmod -R 775 /u01/app
26ai Grid environment file:
ORACLE_SID=+ASM; export ORACLE_SID ORACLE_BASE=/u01/app/oracle; export ORACLE_BASE ORACLE_HOME=/u01/app/oracle/product/23.0.0/grid; export ORACLE_HOME export PATH=$ORACLE_HOME/bin:$HOME/bin:$PATH umask 022 alias oh='cd $ORACLE_HOME'
26ai DB environment file:
ORACLE_HOSTNAME=$HOSTNAME; export ORACLE_HOSTNAME ORACLE_SID=TEST26; export ORACLE_SID ORACLE_UNQNAME=TEST26; export ORACLE_UNQNAME ORACLE_BASE=/u01/app/oracle; export ORACLE_BASE ORACLE_HOME=/u01/app/oracle/product/23.0.0/dbhome_1; export ORACLE_HOME export PATH=$ORACLE_HOME/bin:$HOME/bin:$PATH umask 022 alias oh='cd $ORACLE_HOME'
We don't need to set DISPLAY and CV_ASSUME_DISTID environment variables anymore.
Additionally, starting with Oracle 23ai, the Container Database (CDB) architecture has become mandatory. Therefore, unlike in a 19c installation, a mandatory Pluggable Database (PDB) must also be created.

Preinstallation Checks for Data Guard
Verify that the Primary database resources are open
$ crsctl stat res -t
$ srvctl start database -d TEST26
$ srvctl start pdb -d TEST26 -pdb TEST26pdb1
The IP addresses and domain information of both servers are added to the "/etc/hosts" file on each server.
# vim /etc/hosts
In order to configure Data Guard, the Primary database must be in "ARCHIVELOG" mode and the "FORCE LOGGING" feature must be enabled.
SQL> select log_mode from v$database;
SQL> select force_logging from v$database;
SQL> shutdown immediate;
SQL> startup mount;
SQL> alter database archivelog;
SQL> alter database open;
SQL> alter database force logging;
For Data Guard configuration, the required system parameters are set on the Primary database and the database is restarted.
SQL> alter system set log_archive_config='DG_CONFIG=(TEST26,TEST26DG)' scope=both;
SQL> alter system set log_archive_dest_2='SERVICE=TEST26DG LGWR ASYNC VALID_FOR=(ONLINE_LOGFILES,PRIMARY_ROLE) DB_UNIQUE_NAME=TEST26DG' scope=both;
SQL> alter system set log_archive_max_processes=30 scope=both;
SQL> alter system set log_archive_dest_state_2=enable scope=both;
SQL> alter system set remote_login_passwordfile=exclusive scope=spfile;
SQL> alter system set standby_file_management=auto scope=both;
SQL> alter system set fal_server='TEST26DG' scope=both;
SQL> alter system set fal_client='TEST26' scope=both;
SQL> shutdown immediate;
SQL> startup;
We can view the status and configuration of the online redo logs, standby redo logs, and their associated physical log files in the database using the queries below.
SQL> select * from v$log;
SQL> select * from v$standby_log;
SQL> select * from v$logfile;
Since we performed a Grid installation and are using ASM for file management, the online redo log files reside in both disk groups (DATA/RECO) defined during the installation phase. Having redo logs in both disk groups causes unnecessary I/O overhead and is also redundant. Therefore, we will drop the redo log groups and recreate them so that they exist only in the DATA disk group.
When dropping and recreating redo logs, it is important to pay attention to the status and number of the redo log groups. As shown below, we currently have three redo log groups. During the drop operation, if the total number of redo log groups would fall below two, the database does not allow the operation to proceed. Therefore, we must either create new redo log groups in advance or perform the drop and create operations consecutively to ensure that the minimum required number of groups is maintained.
SQL> ALTER DATABASE DROP LOGFILE GROUP 1;
SQL> ALTER DATABASE ADD LOGFILE GROUP 1 '+DATA' SIZE 209715200;
SQL> ALTER DATABASE DROP LOGFILE GROUP 2;
SQL> ALTER DATABASE ADD LOGFILE GROUP 2 '+DATA' SIZE 209715200;
SQL> ALTER SYSTEM SWITCH LOGFILE;
SQL> ALTER SYSTEM CHECKPOINT;
SQL> ALTER DATABASE DROP LOGFILE GROUP 3;
SQL> ALTER DATABASE ADD LOGFILE GROUP 3 '+DATA' SIZE 209715200;
Additionally, when deciding to drop a redo log group, ensure that its STATUS=INACTIVE.
A redo log group with STATUS=CURRENT represents the log file that is currently in use. The active log can be switched to the next group by executing the "alter system switch logfile" command. Redo log groups with STATUS=ACTIVE indicate that the log file is not currently being written to, however, it may still be required for crash recovery or block recovery purposes in the event of a database failure or block-level corruption.
The "alter system checkpoint " command manually triggers the writing of dirty buffers (modified blocks) from memory to the data files. This operation may also cause redo log groups with STATUS=ACTIVE to transition to STATUS=INACTIVE, provided that they are no longer required for crash recovery.

Standby redo log files are created so that the redo log data transferred from the primary database can be received and processed by the standby database.
We create the Standby redo log files in the same disk group as the primary redo log files, with the same size and one additional group. It is not mandatory to create Standby redo log files on the primary side but they should be added to avoid any issues during a possible switchover operation.
SQL> alter database add standby logfile thread 1 group 11 ('+DATA') size 209715200;

SQL> alter database add standby logfile thread 1 group 12 ('+DATA') size 209715200;

SQL> alter database add standby logfile thread 1 group 13 ('+DATA') size 209715200;

SQL> alter database add standby logfile thread 1 group 14 ('+DATA') size 209715200;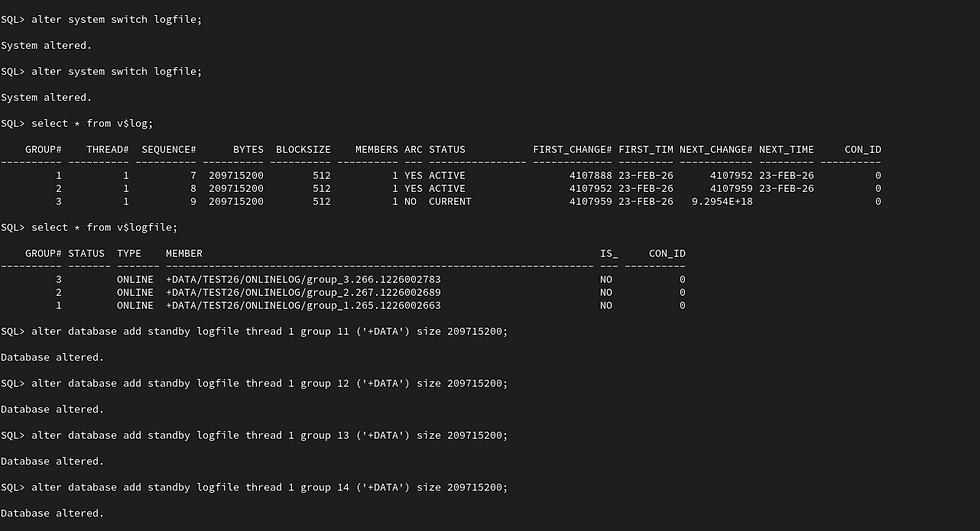
When we run our query, we can display the redo log and Standby redo log files as shown in the figure.

Update the tnsnames.ora file on both hosts.
$ vim $ORACLE_HOME/network/admin/tnsnames.oraTEST26 =
(DESCRIPTION =
(ADDRESS = (PROTOCOL = TCP)(HOST = 192.168.0.20)(PORT = 1521))
(CONNECT_DATA =
(SERVER = DEDICATED)
(SERVICE_NAME = TEST26)
)
)
TEST26DG =
(DESCRIPTION =
(ADDRESS = (PROTOCOL = TCP)(HOST = 192.168.0.21)(PORT = 1521))
(CONNECT_DATA =
(SERVER = DEDICATED)
(SERVICE_NAME = TEST26DG)
)
)
The listener.ora file is configured on the Standby.
$ . .grid
$ vim $ORACLE_HOME/network/admin/listener.ora
SID_LIST_LISTENER =
(SID_LIST =
(SID_DESC =
(GLOBAL_DBNAME = TEST26DG)
(ORACLE_HOME = /u01/app/oracle/product/23.0.0/dbhome_1)
(SID_NAME = TEST26DG)
)
)
After waiting approximately one minute or after connecting to the database and executing the "alter system register " command, the services associated with the ASM instance will start running.
$ srvctl stop listener -l LISTENER
$ srvctl start listener -l LISTENER
$ lsnrctl status LISTENER

On the standby server, let’s create the "pfile.ora" file under the "/tmp" directory and populate it with the minimum required parameters.
$ vim /tmp/pfile.oradb_name='TEST26'
db_unique_name='TEST26DG'
Transfer the password file from primary host to standby host.
$ scp $ORACLE_HOME/dbs/orapwTEST26 oracle@192.168.0.21:/u01/app/oracle/product/23.0.0/dbhome_1/dbs/orapwTEST26DG
Connect to database and startup on nomount mode using previously created pfile.ora file.
$ sqlplus / as sysdba

SQL> STARTUP NOMOUNT PFILE='/tmp/pfile.ora';
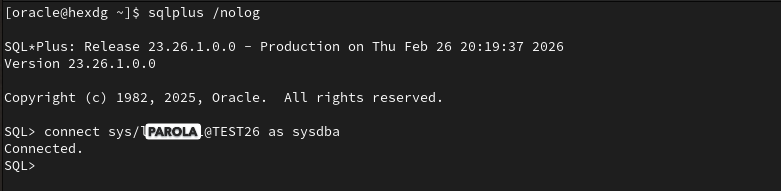
Perform tnsping and connection tests from each other.
$ tnsping TEST26
$ tnsping TEST26DG

$ sqlplus /nolog

SQL> connect sys/<parola>@TEST26 as sysdba
SQL> connect sys/<parola>@TEST26DG as sysdba

Data Guard Installation
If all connection tests have been completed successfully, we can start copying our primary database as a standby database using the DUPLICATE command in RMAN.
This command can be executed from either the primary or the standby server. For now it will be run from the standby server.
$ cd
$ . .db26ai_env
$ rman target sys/<PASSWORD>@TEST26 auxiliary sys/<PSSWORD>@TEST26DG
RMAN> run{
allocate channel prmy1 type disk;
allocate channel prmy2 type disk;
allocate auxiliary channel stby1 type disk;
allocate auxiliary channel stby2 type disk;
duplicate target database for standby from active database dorecover NOFILENAMECHECK
spfile
parameter_value_convert 'TEST26','TEST26DG', 'test26', 'test26dg'
set db_name='TEST26'
set db_unique_name='TEST26DG'
set log_archive_max_processes='30'
set fal_server='TEST26'
set standby_file_management='AUTO'
set log_archive_config='DG_CONFIG=(TEST26,TEST26DG)'
set log_archive_dest_2='SERVICE=TEST26 ASYNC valid_for=(ONLINE_LOGFILE,PRIMARY_ROLE) DB_UNIQUE_NAME=TEST26'
;
}
Attention: If any error is encountered during the DUPLICATE process, after resolving the issue, the instance on the secondary side is shut down using the shutdown abort command. Then using ASMCMD, the spfile created on the disks and any datafiles that may have been partially created are deleted. After starting again in Nomount mode, the DUPLICATE command is executed again.
$ cd
$ . .grid_env
$ asmcmd -p

ASMCMD [+]> ls
.
.
.

After the duplication process is successfully completed, the database is opened in "Read Only" mode and the recovery process is started to ensure that the logs are applied simultaneously on the standby side. You can monitor the lag times using the query below.
$ cd
$ . .db26ai_env
$ sqlplus / as sysdba
SQL> alter database open read only;
SQL> alter database recover managed standby database using current logfile disconnect from session;
SQL> set lines 200 pages 200
SQL> select name, value, time_computed from v$dataguard_stats where name like '%lag';

Now we are sure that our real time running Data Guard database is ready and fully operational.
The dynamic view “v$managed_standby” provides important insights about Data Guard. MRP is the process responsible for applying the logs while RFS is the process that receives the archived logs sent from the primary database and forwards them to MRP. The Thread column indicates which instance the transmitted file originated from. If RAC is being used, you may see as many threads as the number of nodes. The Block# column shows the block number currently being processed and Sequence# represents the log file sequence number.
SQL> select process,status,thread#,sequence#,block#,blocks from v$managed_standby order by 1;
What conclusions can we draw here?
If we see that the block sent by RFS and the block processed by MRP are at the same sequence, it means there is no lag in this database and confirms that MRP is actively running.
If RFS is ahead of MRP and MRP is in the “APPLYING_LOG” state, it indicates that the standby side cannot keep up with processing. In this case, using parallel MRP may help improve performance.
If MRP is ahead of RFS, we can conclude that there is slowness in log transmission related to the network.
If RFS is running but MRP is in the “WAIT_FOR_GAP” or “WAIT_FOR_LOG” state, it means MRP cannot find the archive log it needs to apply. These logs may have been corrupted during transmission or deleted for other reasons.
Using the dynamic view “v$archived_log” we can monitor the processing status of archived logs.
SQL> select sequence#, first_time, next_time, applied from v$archived_log order by 1;
For demonstration purposes, we can observe the sequence numbers by executing the "alter system switch logfile" command on the primary database.

Let’s run the archived log query again on the standby database. The value APPLIED=‘IN-MEMORY’ indicates that the log files have been applied in memory, but the data files have not yet been updated.

Using another dynamic view “v$dataguard_config” we can observe the Data Guard configuration established between the primary and standby databases.

Now, to observe how Data Guard works, let’s do a simple exercise. Let’s create a table in the primary database, insert a record into it and then commit the transaction.
$ sqlplus / as sysdba

SQL> create table test (id number, name varchar2(100));
SQL> insert into test values (1,'HEX');
SQL> commit;
When we try to query the same table in the standby database, we can see both the existence of the table and the record that we added in the primary database.

See you in our next articles.


Comments