Apache NiFi Cluster (CentOS 7)
- Murat Can ÇOBAN

- Aug 11, 2022
- 3 min read
My post is about installing Apache NiFi Cluster. It will be a detailed post including from Oracle Virtual Box settings to Zookeeper installation.
WHAT IS APACHE NIFI?
Apache NiFi is an open-source software used for automating and managing data flow among the systems. It is a strong and safe system to process and dispense data. It has a web-based user interface which enables creating, following and checking of data flows. Its data flow process can be configured or changed so as to change data in the runtime.
a) Oracle VM VirtualBox Machine Installation
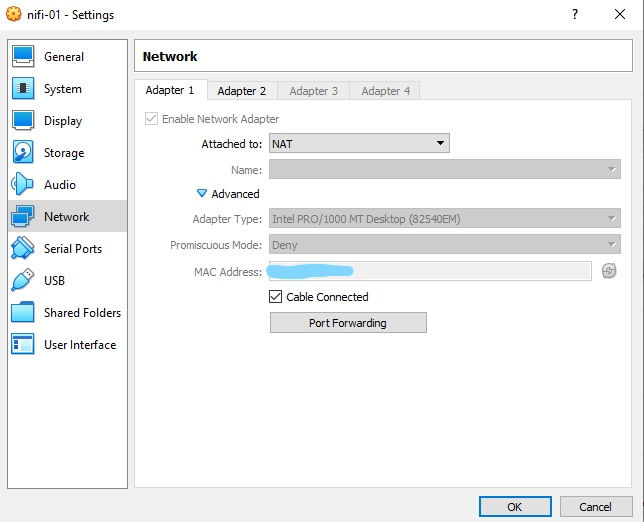
You can choose sources of the machine you will create but there are some adjustments to do in network.
Adapter 1 is like that as default. No changes here.
Choose "Enable Network Adapter" in Adapter2 and change the settings.
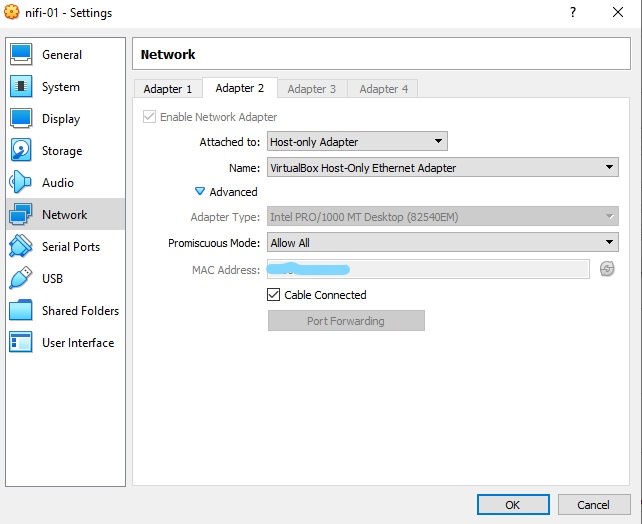
You can adjust settings in only one server and create other servers with the clone option. Or if you have servers you need to adjust those settings in each server.
b) Network Settings of the Server
You can adjust the settings, hostname and IPs below. In general, I suggest you adjust those settings in the other parameters. Adjust those settings in each server and IPADDR column should be different in each server.
vi /etc/sysconfig/network
NETWORKING=yes
HOSTNAME=nifi01 (different for each server)
vi /etc/sysconfig/network-scripts/ifcfg-enp0s8
TYPE=Ethernet
DEVICE=enp0s8
BOOTPROTO=static
ONBOOT=yes
NETMASK=255.255.255.0
GATEWAY=192.168.56.1
IPADDR=192.168.56.101 (different for each server)
NM_CONTROLLED=noAdjust the same setting in each server for the servers to communicate with each other.
vi /etc/hosts
192.168.56.101 nifi01
192.168.56.102 nifi02
192.168.56.103 nifi03
vi /etc/hostname
nifi01 (different for each server)service network restartc) JAVA Installation
Install Java as below and check it.
yum install java-1.8.0-openjdk
java -version
c) Zookeeper Installation
NiFi has an embedded Zookeper in it but since there is not a highly suggested method, I definitely suggest you install Zookeper. Click here to download Zookeeper.
Create a user and password for Zookeeper.
useradd -m zookeeper
passwd zookeeper
Extract the downloaded file from zip and send it to relevant index. Then, grant authorization.
tar zxf apache-zookeeper-3.7.1-bin.tar.gz
cp -rf apache-zookeeper-3.7.1-bin/* /home/zookeeper
chown -R zookeeper:zookeeper /home/zookeeper
Switch to our user and adjust the settings. Create the data file we've created in each server in the same index. Then, enter value of the command we created with echo in each server (1 for server 1, 2 for server 2, 3 for server 3). We'll create the configuration file with cp command and adjust settings in zoo.cfg.
su - zookeeper
mkdir data
echo 1 > data/myid (2,3 for other nodes)
cp ./conf/zoo_sample.cfg ./conf/zoo.cfg
Go to file zoo.cfg and adjust the settings.
vi zoo.cfg

tickTime=2000
dataDir=/home/zookeeper/data
clientPort=2181
initLimit=5
syncLimit=2
server.1=nifi01:2888:3888
server.2=nifi02:2888:3888
server.3=nifi03:2888:3888
Start zookeeper now. Make this easier by creating a service for it.
vi /etc/systemd/system/zookeeper.service[Unit]
Description=Zookeeper Daemon
Documentation=http://zookeeper.apache.org
Requires=network.target
After=network.target
[Service]
Type=forking
WorkingDirectory=/home/zookeeper
User=zookeeper
ExecStart=/home/zookeeper/bin/zkServer.sh start /home/zookeeper/conf/zoo.cfg
ExecStop=/home/zookeeper/bin/zkServer.sh stop /home/zookeeper/conf/zoo.cfg
ExecReload=/home/zookeeper/bin/zkServer.sh restart /home/zookeeper/conf/zoo.cfg
TimeoutSec=30
Restart=on-failure
[Install]
WantedBy=default.target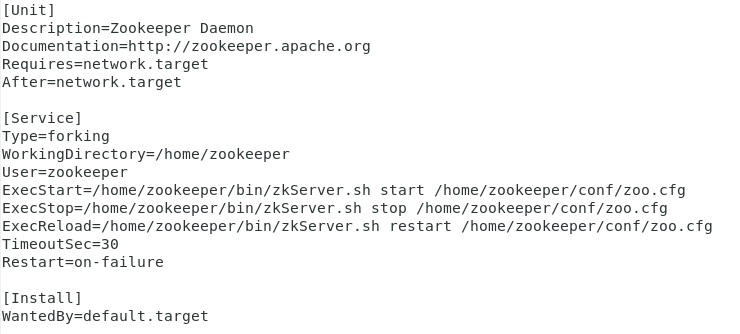
Upon creating the service file, start the service.
systemctl daemon-reload
systemctl start zookeeper.service
systemctl enable zookeeper.service
You can check the status of the service.
systemctl status zookeeper.service
d) NiFi Installation
Create a NiFi user and password.
useradd -m nifi
passwd nifi
You can download the file here. Then, extract the file from zip, send it to the appropriate index and allow.
tar zxf nifi-1.16.3-bin.tar.gz
cp -rf nifi-1.16.3/* /home/nifi
chown -R nifi:nifi /home/nifi
Switch to NiFi user and check the settings. There are many settings in nifi.properties but you can see the parameters we need below. Adjust those settings in each server.
su - nifi
vi /home/nifi/conf/nifi.properties

nifi.cluster.is.node=true
nifi.cluster.node.address=nifi01 (nifi02,nifi03 for other nodes)
nifi.cluster.node.protocol.port=11443
nifi.cluster.node.load.balance.port=6342
nifi.remote.input.host=nifi01 (nifi02,nifi03 for other nodes)
nifi.remote.input.secure=false
nifi.remote.input.socket.port=10000
nifi.web.http.host=nifi01 (nifi02,nifi03 for other nodes)
nifi.web.http.port=9999
nifi.zookeeper.connect.string=nifi01:2181,nifi02:2181,nifi03:2181
Adjust as below in state-management file for Zookeeper. Adjust those settings in each server.
vi /home/nifi/conf/state-management.xml
<property name="Connect String">nifi01:2181,nifi02:2181,nifi03:2181</property>
Be sure that you've adjusted all of the settings I've shown above. Settings are completed so we can start NiFi now. Start NiFi in each server with the command below. Then, there will be a waiting time of 300 seconds for worker and master elections of the cluster we've installed by following the log file. You can see the waiting time in the log file.
/home/nifi/bin/nifi.sh start
/home/nifi/logs/nifi-app.log
When the election is completed, we'll see the screens below. You can access NiFi web ui with the url.

3/3 you see in the upper-left gives you information about cluster nodes (there are 3 nodes in total, all are attached). You can see more detailed settings in cluster in the upper-right.

In this post, we've examined Apache NiFi with you. You may support us by sharing the post if you've liked it.
Hope to see you in new posts, take care.


Comments